Documenting things I find interesting about SQL Server and technology. 
First blog post
This is the post excerpt.
This is the post excerpt.
Documenting things I find interesting about SQL Server and technology.
Always Encrypted(AE) is a new feature for SQL Server 2016 that protects data at rest as well as data in motion. AE is implemented at the column level. Two keys are used to protect an AE encrypted column. The Column Encryption Key which is stored in the database, and the Column Master Key which is stored on a client machine like an application server. The key to making this work is that the Column Master Key is stored on a different machine than the SQL server; therefore, the column can only be unencrypted by the machine where the Column Master Key is stored. The client will need an Always Encrypted compatible driver. The unencryption process happens at the driver level of the client machine. In this example I will use Always Encrypted on an Azure database. I think this is a good use case for AE. If your Azure DB gets compromised, you don’t want cloud operators to have access to your sensitive data, or you are worried about cloud security in general, this is a good solution.
I am going to use the same database and table I used in the prevoius Dynamic Data Masking(DDM) demo. Be sure to remove DDM on any columns you want to use AE because AE is not compatible with DDM.
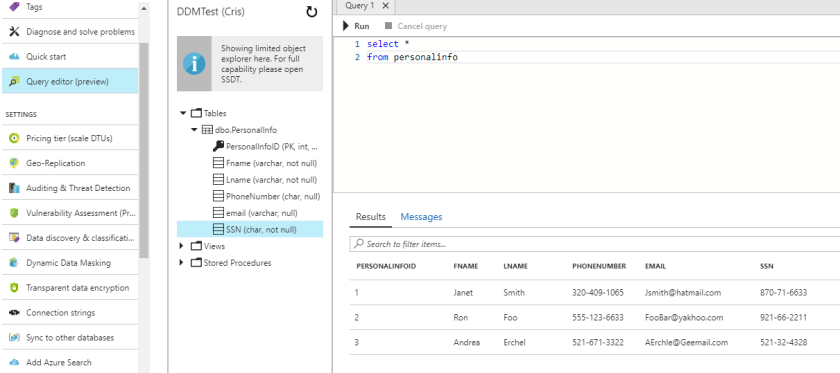
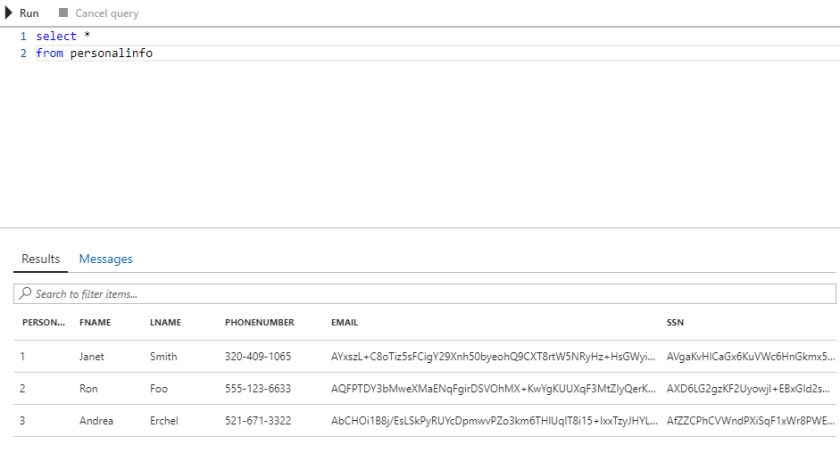
Here is the data we are working with queried from the Azure interface.
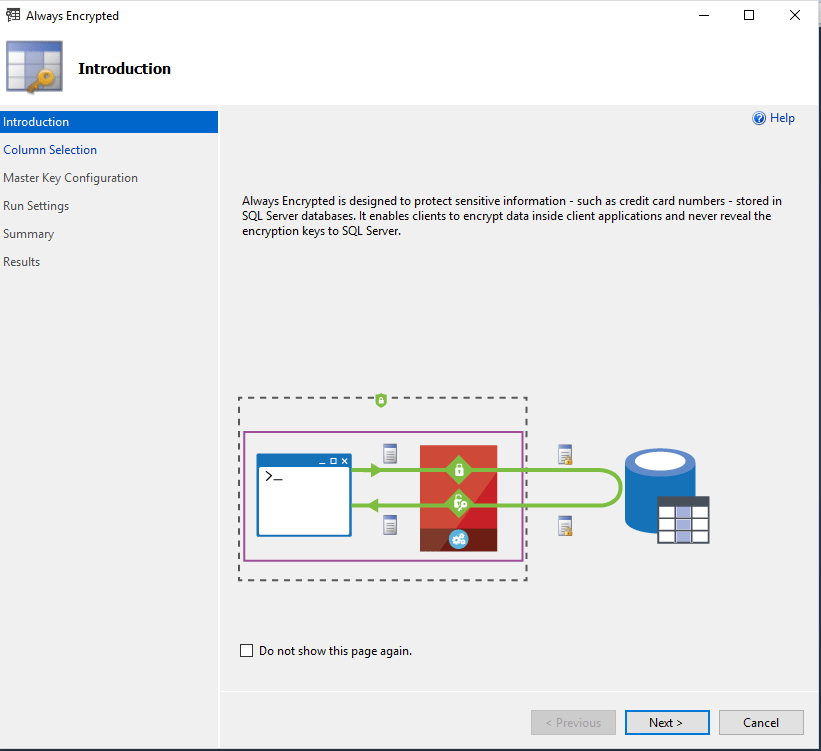
Open up SSMS and connect to your Azure DB. Then right click on the table you want to encrypt and select encrypt columns.

This will launch the AE wizard
Hit next and select the columns you want to encrypt. You will need to select the encryption type. You can choose either Deterministic or Random. Deterministic means that it will always generate the same value for a given plain text value. This will enable you to filter, join and index the column. Deterministic is not as secure and someone may be able to guess the values especially if the data is not widely variable like a yes or no field. Random means that it will not generate the same value for a given plain text value. this is considered more secure but you cannot filter, join or index the column.
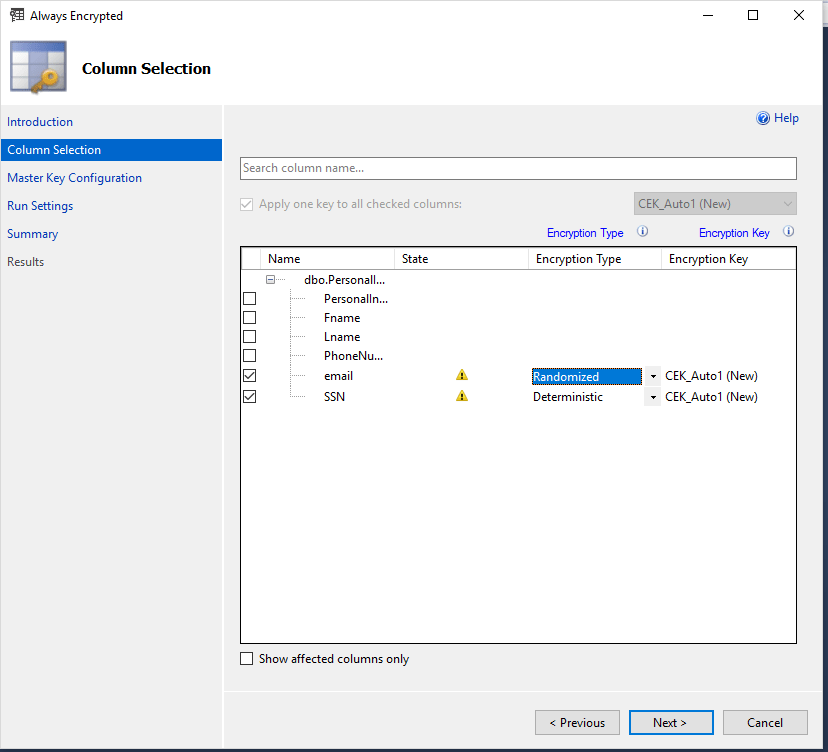
AE columns can only use the Latin1_General_ BIN2 coalition. Keep in mind BIN2 is case sensitive. This might create problems filtering or joining. In this case the AE wizard will convert my columns to BIN2. The Wizard gives you a warning.

Next is the Column Master Key configuration.
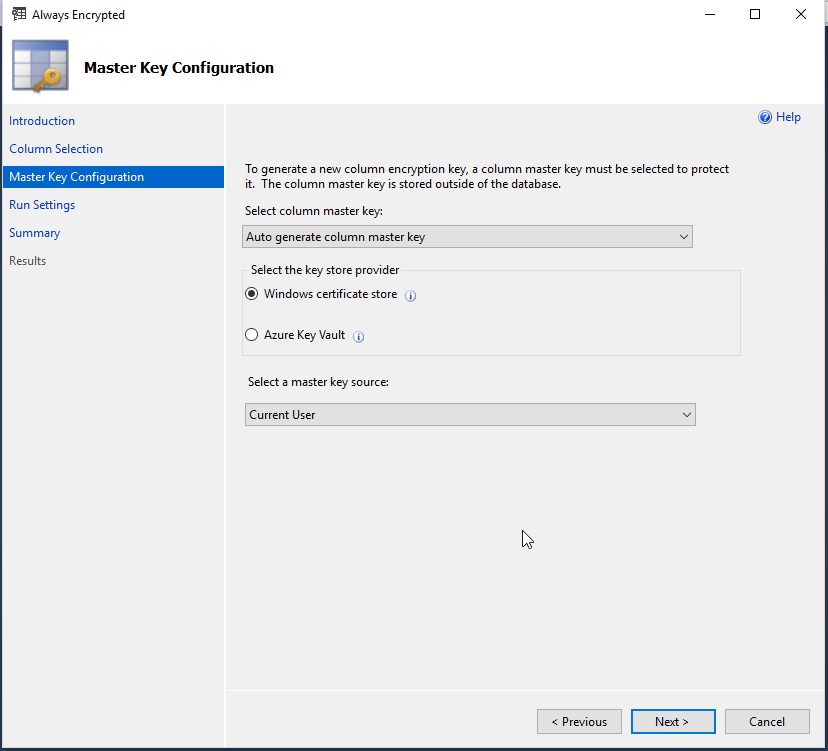
the wizard gives you information on the Key Providers.
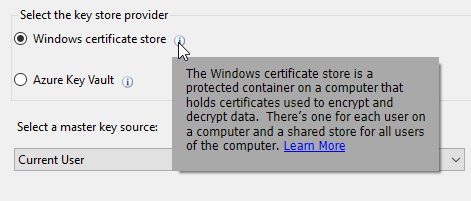
We are going to use the Windows certificate to create a CMK on the client.
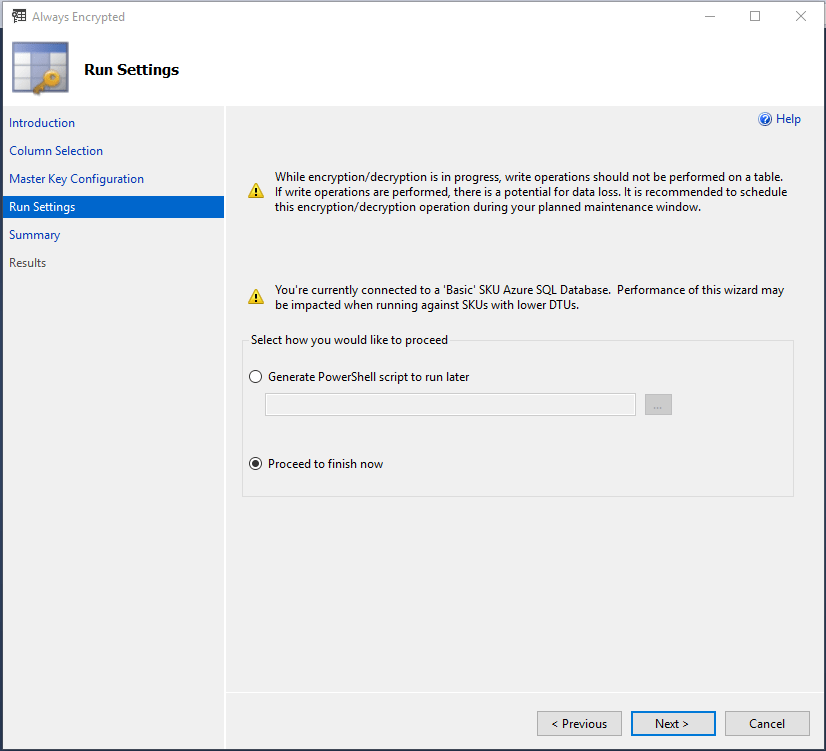
The wizard warns me that I don’t have enough Database Transaction Units (DTUs) to expect any performance while encrypting. This did take a surprising amount of time to encrypt 2 columns with 3 rows. A little over 5 minutes! This is just a demo so we will have to deal with the low DTUs, but if you were to really do this you will need to crank up your DTUs.
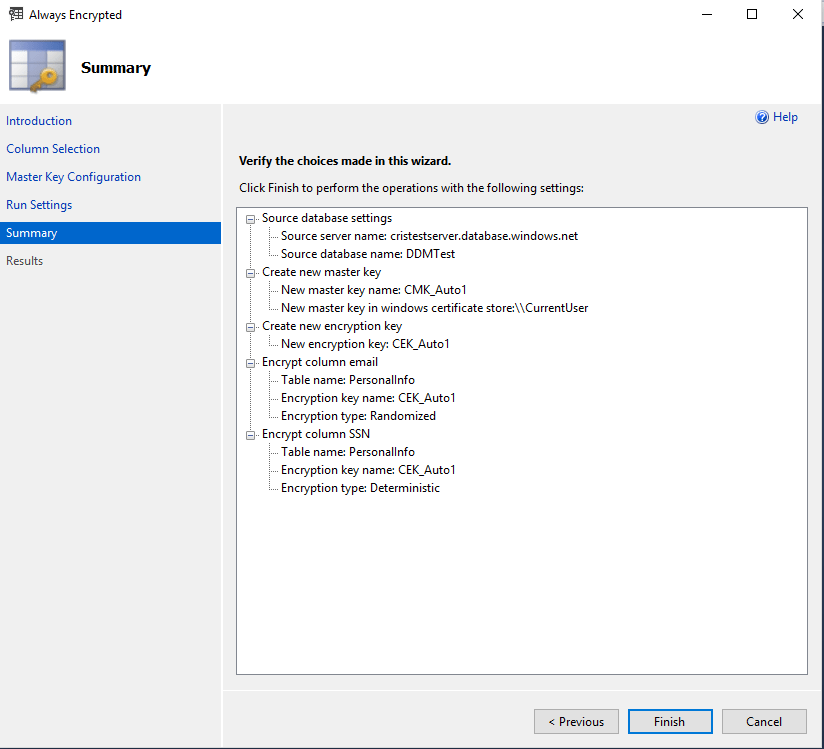
The Summary
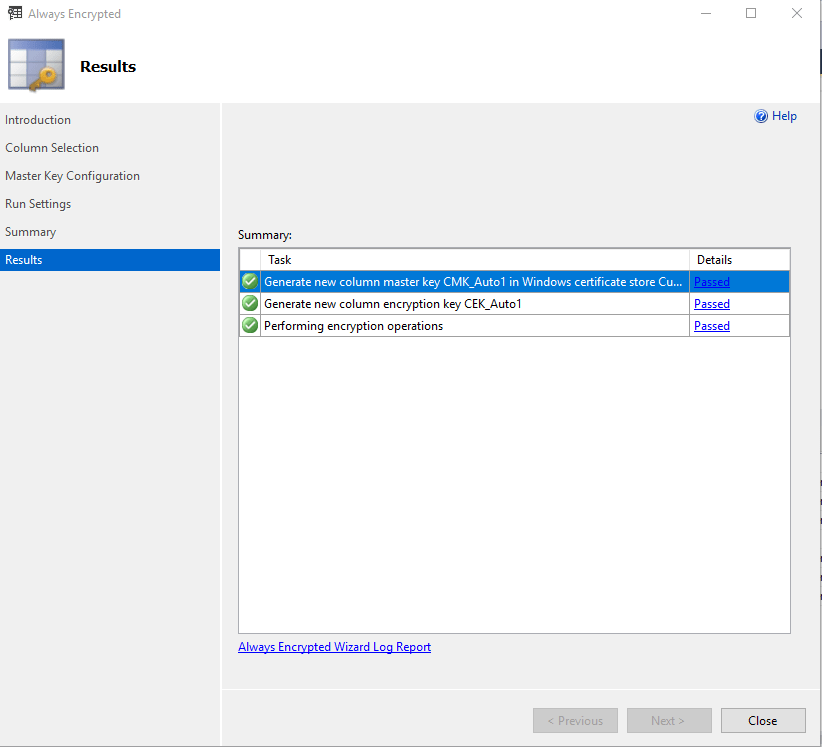
Done
Now when I query the data from the Azure interface it is encrypted.
AE was designed for an application to interact with the encrypted data. However, you can interact with it using SSMS. SSMS 2017 has features built in to interact with AE data.
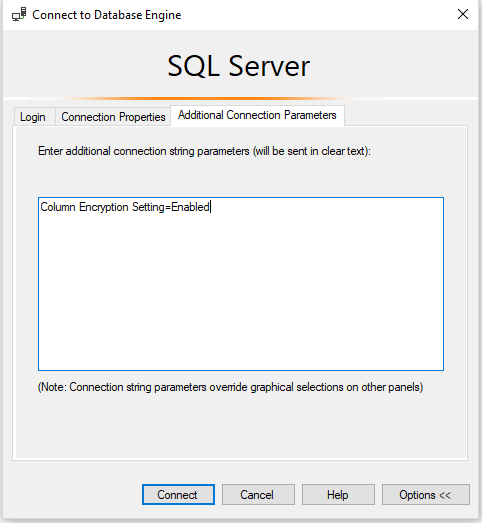
you have to specify in the connection that it needs to use an encrypted connection:
Column Encryption Setting = Enabled
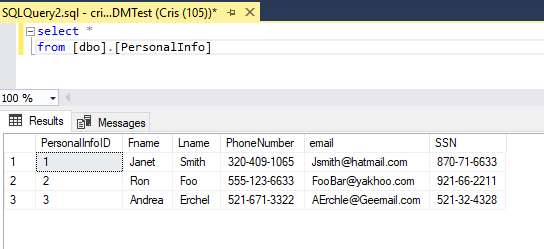
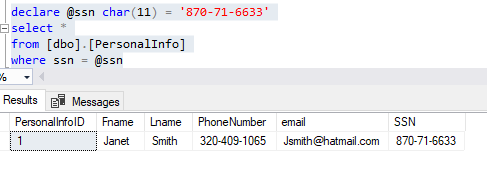
Now when we query from a client that contains the CMK, you can see the unencrypted data.
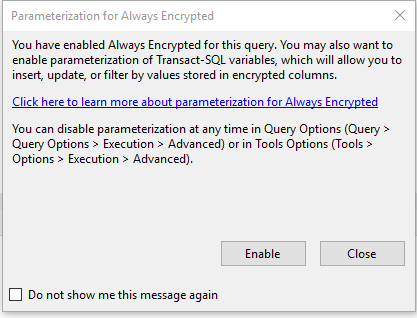
AE is intended for use with parameterization. If you try to filter the query using a literal you will get an error. If you do not turn on the query parameterization option you will get an error. The parameterization option is only available in SSMS 2017 and greater. You need to filter by variable and have parameterization on. SSMS will warn you about this
or you can turn it on in the query options.
Now you can filter, update, insert the data in SSMS
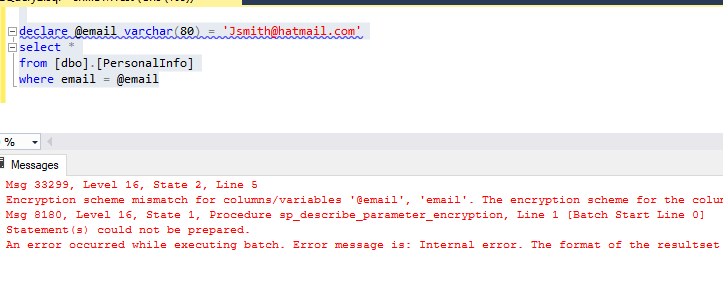
What happens if we try to filter on the Randomized column we encrypted? It won’t work. you get an error.
Msg 33299, Level 16, State 2, Line 6
Encryption scheme mismatch for columns/variables ’email’, ‘@email’. The encryption scheme for the columns/variables is (encryption_type = ‘RANDOMIZED’, encryption_algorithm_name = ‘AEAD_AES_256_CBC_HMAC_SHA_256’, column_encryption_key_name = ‘CEK_Auto1’, column_encryption_key_database_name = ‘DDMTest’) and the expression near line ‘5’ expects it to be (encryption_type = ‘DETERMINISTIC’) (or weaker).
Msg 8180, Level 16, State 1, Procedure sp_describe_parameter_encryption, Line 1 [Batch Start Line 1]
Statement(s) could not be prepared.
An error occurred while executing batch. Error message is: Internal error. The format of the resultset returned by sp_describe_parameter_encryption is invalid. One of the resultsets is missing.
Always Encrypted ensures only approved applications can see the unencrypted the data. Although we used SSMS 2017 in the demo, AE columns are meant for an application with a compatible driver and a copy of the Column Master Key to interact with the data. Always Encrypted prevents cloud operators, or other high level, but unauthorized users from seeing the data. It protects data in motion and data at rest.
In my last blog post I showed how to implement dynamic data masking(DDM). With Azure it is even easier. Azure has a built in security setting to implement DDM.
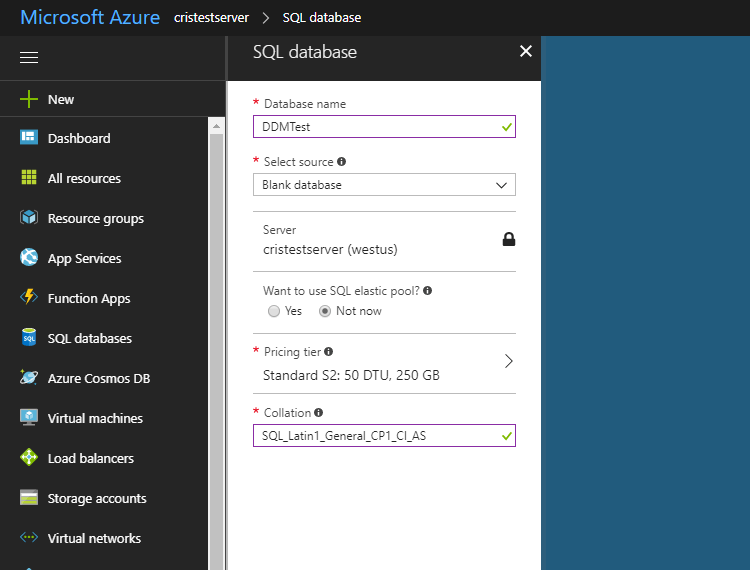
Just launch the Azure portal and go to the database you want to mask. In this case I created a database just for this purpose called DDMTest.
I created table with sensitive data. The same table I used in the last demo. Launch SSMS and connect to your Azure database.
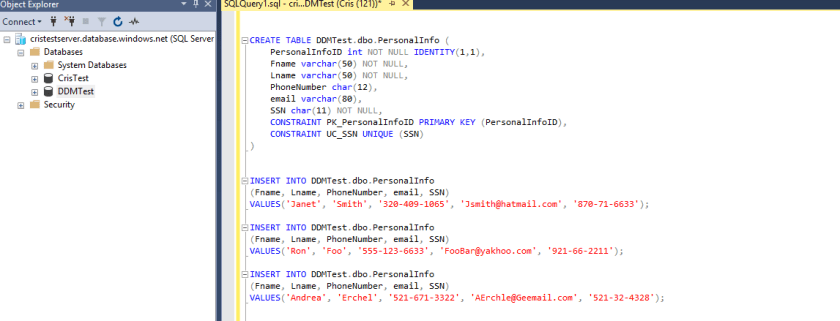
CREATE TABLE DDMTest.dbo.PersonalInfo (
	PersonalInfoID int NOT NULL IDENTITY(1,1),
	Fname varchar(50) NOT NULL,
	Lname varchar(50) NOT NULL,
	PhoneNumber char(12),
	email varchar(80),
	SSN char(11) NOT NULL,
	CONSTRAINT PK_PersonalInfoID PRIMARY KEY (PersonalInfoID),
	CONSTRAINT UC_SSN UNIQUE (SSN)
)

INSERT INTO DDMTest.dbo.PersonalInfo
(Fname, Lname, PhoneNumber, email, SSN)
VALUES('Janet', 'Smith', '320-409-1065', 'Jsmith@hatmail.com', '870-71-6633');

INSERT INTO DDMTest.dbo.PersonalInfo
(Fname, Lname, PhoneNumber, email, SSN)
VALUES('Ron', 'Foo', '555-123-6633', 'FooBar@yakhoo.com', '921-66-2211');

INSERT INTO DDMTest.dbo.PersonalInfo
(Fname, Lname, PhoneNumber, email, SSN)
VALUES('Andrea', 'Erchel', '521-671-3322', 'AErchle@Geemail.com', '521-32-4328');
Go back to your Azure portal and go to the database security settings and select dynamic data masking.
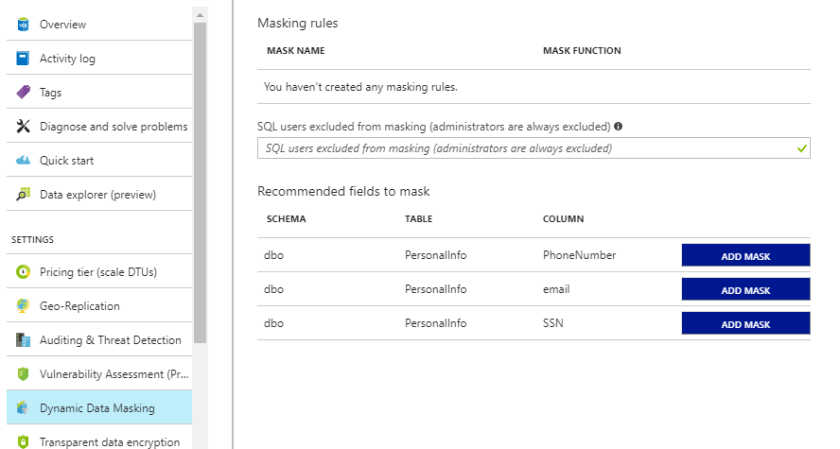
Azure identifies potentially sensitive fields and recommends fields to mask. This time Azure found all my sensitive fields! You can pick other fields, and decide on the masking functions you want. Here I just went with the recommended fields and used the recommended masking functions.
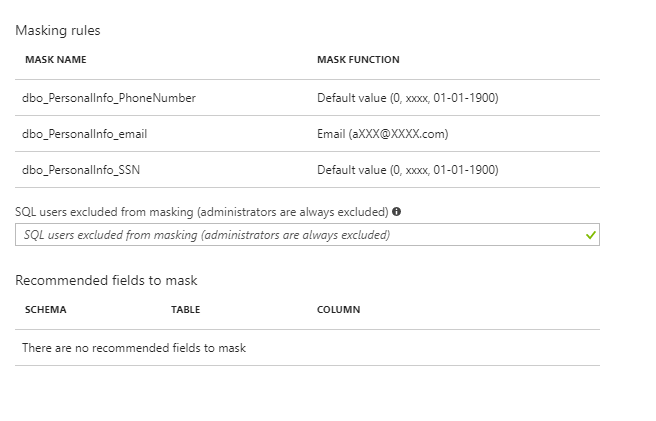
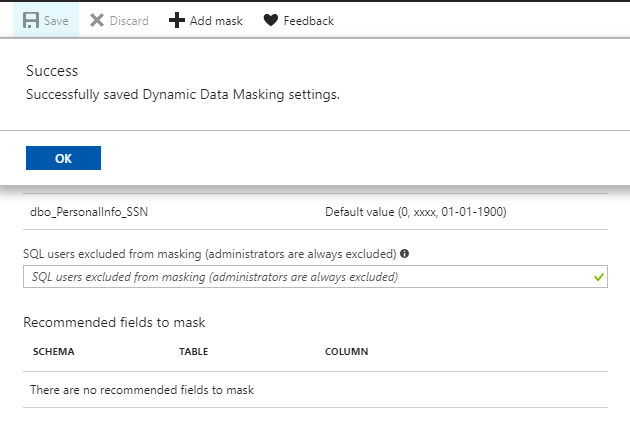
hit OK and Save
Now I will create a low privileged user with SELECT permission on the table and run a query as that user.
Select permissions is not enough to see the real data. We can grant UNMASK on the database for the user to see the real data.
Dynamic Data Masking is a security feature added in SQL Server 2016. Dynamic Data Masking uses functions attached to the column’s definition to obfuscate that column’s data. The data will be obfuscated to all users who are not DBO or do not have the the unmask privilege. There are 4 functions you can use to mask a column: 1. random 2. email 3. default and 4. custom.
Simple DDM demo:
create a database, create a table and insert some fake sensitive data in it.
create database DDMTest
-- put your files, options here if needed
use DDMTest;

CREATE TABLE DDMTest.dbo.PersonalInfo (
	PersonalInfoID int NOT NULL IDENTITY(1,1),
	Fname varchar(50) NOT NULL,
	Lname varchar(50) NOT NULL,
	PhoneNumber char(12),
	email varchar(80),
	SSN char(11) NOT NULL,
	CONSTRAINT PK_PersonalInfoID PRIMARY KEY (PersonalInfoID),
	CONSTRAINT UC_SSN UNIQUE (SSN)
)

INSERT INTO DDMTest.dbo.PersonalInfo
(Fname, Lname, PhoneNumber, email, SSN)
VALUES('Janet', 'Smith', '320-409-1065', 'Jsmith@hatmail.com', '870-71-6633');

INSERT INTO DDMTest.dbo.PersonalInfo
(Fname, Lname, PhoneNumber, email, SSN)
VALUES('Ron', 'Foo', '555-123-6633', 'FooBar@yakhoo.com', '921-66-2211');

INSERT INTO DDMTest.dbo.PersonalInfo
(Fname, Lname, PhoneNumber, email, SSN)
VALUES('Andrea', 'Erchel', '521-671-3322', 'AErchle@Geemail.com', '521-32-4328');
I could have added masking to the table definition during create but here we will add it afterwards using ALTER statements. I will mask [email] using the “email” masking function and [SSN] using the “custom” masking function so I can specify my own mask format. In this case I want the last 4 digits of the SSN visible so I can specify that with the 3rd parameter of the custom masking function. The custom function’s 1st parameter is how many characters in the front you want unmasked and the 2nd parameter is the custom mask you want between what you choose to have unmasked. If you did not want any of the data unmasked then you could just use the default masking function.
/*example function definition FUNCTION = 'partial(prefix # char unmasked,[padding],suffix # char unmasked)'*/
ALTER TABLE DDMTest.dbo.PersonalInfo
	ALTER COLUMN SSN ADD MASKED WITH (FUNCTION = 'PARTIAL(0,"XXX-XX-",4)')

ALTER TABLE DDMTest.dbo.PersonalInfo
	ALTER COLUMN email ADD MASKED WITH (FUNCTION = 'email()')
Now we need to create a user with select access to the table
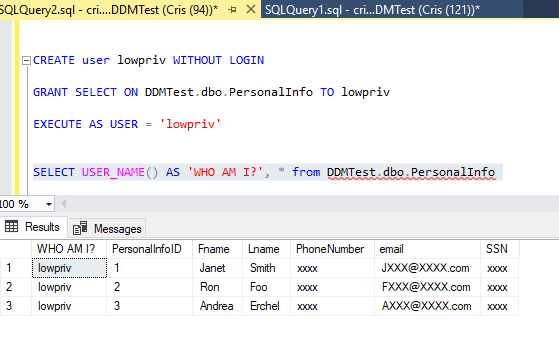
CREATE user lowpriv WITHOUT LOGIN

GRANT SELECT ON DDMTest.dbo.PersonalInfo TO lowpriv
run a select on the table as a lower privileged user.
EXECUTE AS USER = 'lowpriv'
SELECT USER_NAME() AS 'WHO AM I?', * from DDMTest.dbo.PersonalInfo
The results for the non-dbo non-unmasked privileged user.

What if we run as DBO?
REVERT
SELECT USER_NAME() AS 'WHO AM I?', * from DDMTest.dbo.PersonalInfo
We can see that dbo can see the data without the mask.

You can alter the column to unmask if you no longer need it obfuscated. Here we will remove the email mask because we think it is acceptable for users to see email addresses.
ALTER TABLE DDMTest.dbo.PersonalInfo
	ALTER COLUMN email DROP MASKED
If we run as lowpriv user again we will now see the email addresses but the SSN is still obfuscated

DDM is a great tool to keep users from seeing sensitive data. It should not be considered highly secure, or unbreakable. It is not a substitute for encryption.
Sometimes I get a request for information about SQL Server Reporting Services report execution frequency. Managers will want to know who is running reports and how often. I want to know what reports are not being used so I can make a case to delete them. I wrote a query to tell you the count the report has executed along with the oldest and most recent execution dates .Run this in your report server database.
SELECT  c.[Path] ,
        c.Name ,
        COUNT(l.ReportID) AS '# of logged executions' ,
        MIN(l.TimeStart) AS 'min logged date' ,
        MAX(l.TimeStart) AS 'max logged date'
FROM    dbo.Catalog c
        LEFT JOIN dbo.ExecutionLog l ON c.ItemID = l.ReportID
GROUP BY c.[Path] ,
        c.Name ,
        c.ItemID
--HAVING COUNT(l.ReportID) = 0 -- shows reports without execution history
ORDER BY c.[Path];
--ORDER BY c.name
--ORDER BY COUNT(l.ReportID) desc
Here I did an additional grouping to break down the count to subscription or interactive executions.
SELECT  c.[Path] ,
        c.Name ,
        COUNT(l.ReportID) AS '# of logged executions' ,
        MIN(l.TimeStart) AS 'min logged date' ,
        MAX(l.TimeStart) AS 'max logged date' ,
        CASE WHEN l.RequestType = 0 THEN 'Interactive'
             WHEN l.RequestType = 1 THEN 'Subscription'
             WHEN l.RequestType = 2 THEN 'Refresh Cache'
             ELSE NULL
        END RequestType
FROM    dbo.Catalog c
        LEFT JOIN dbo.ExecutionLog l ON c.ItemID = l.ReportID
GROUP BY c.[Path] ,
        c.Name ,
        c.ItemID ,
        CASE WHEN l.RequestType = 0 THEN 'Interactive'
             WHEN l.RequestType = 1 THEN 'Subscription'
             WHEN l.RequestType = 2 THEN 'Refresh Cache'
             ELSE NULL
        END
--ORDER BY c.[Path]
--ORDER BY c.name
ORDER BY COUNT(l.ReportID) DESC;
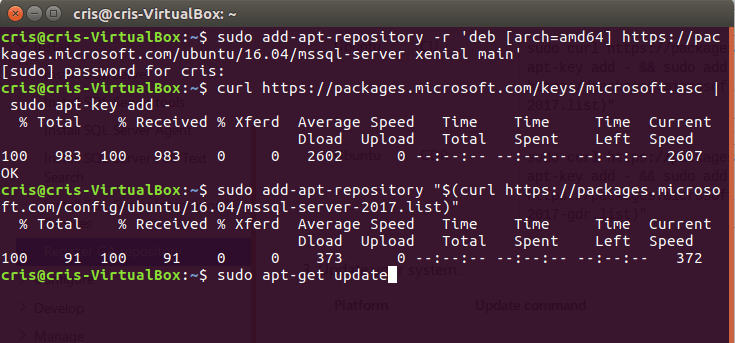
If you have installed a pre-GA version, you will need to remove that version from the repository.
 2. or you can use bash
sudo add-apt-repository -r 'deb [arch=amd64] https://packages.microsoft.com/ubuntu/16.04/mssql-server xenial main'
3. Import the key
curl https://packages.microsoft.com/keys/microsoft.asc | sudo apt-key add -
4. Register the Microsoft SQL Server Ubuntu repository
sudo add-apt-repository "$(curl https://packages.microsoft.com/config/ubuntu/16.04/mssql-server-2017.list)"
5.Update the package lists
sudo apt-get update
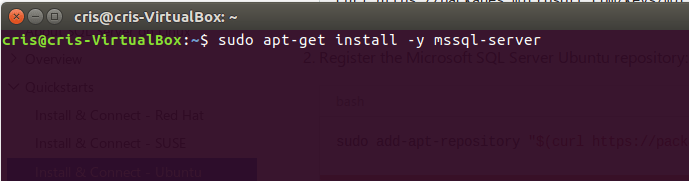
6.Install SQL Server
sudo apt-get install -y mssql-server
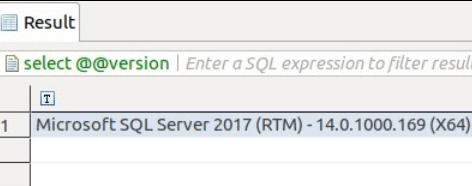
Check out the new version.

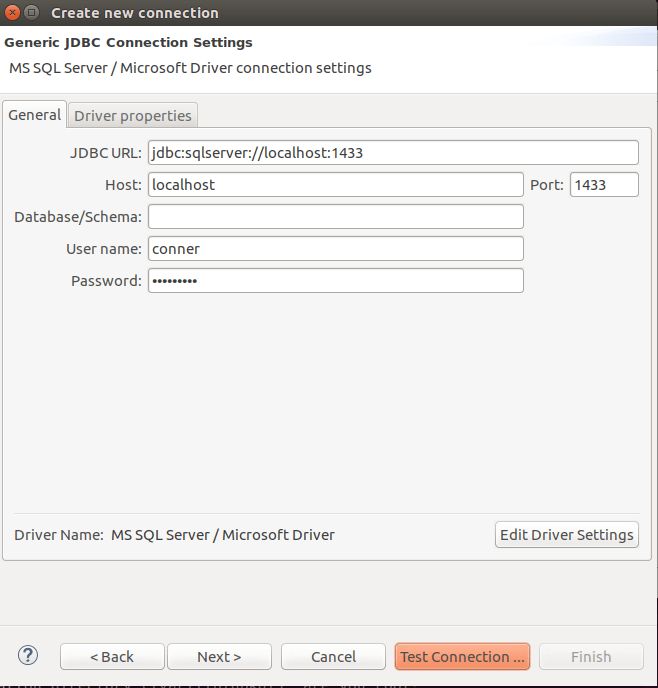
DBeaver is a free Universal SQL Client. It works with SQL Server as well as most other database platforms. https://dbeaver.jkiss.org/
Since SSMS is not yet available for Linux, I wanted a database client that could browse objects, write queries and would get results as a nice grid. DBeaver is laid out very nicely and comes with a SQL prompter and SQL formatter. It does not have all of the functionality that SSMS has. It is missing most of the GUI based SQL server administrative tasks, like right clicking add login, and similar functions but that can all be done via TSQL anyway. DBeaver would work great for a developer who needs to connect to multiple DB platforms and wants to create projects and write SQL code and who is does not need GUI based administrative tasks.
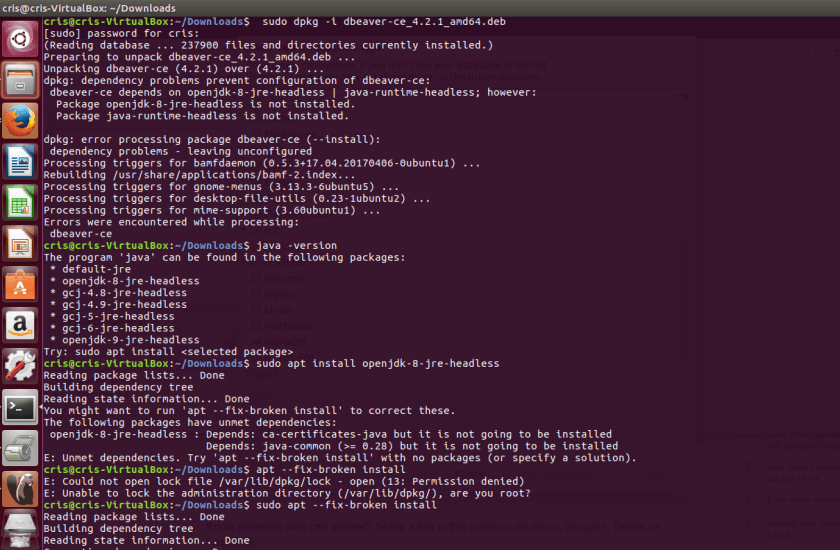
Below is the code to install. I ran into an issue because my Ubuntu VM did not have Java installed. I searched for the java packages that were installed and Ubuntu told me it didn’t have any so I followed the prompt to install. Ubuntu even gave me the commands I needed. I also had an unmet dependency but Ubuntu gave me the command to fix it.
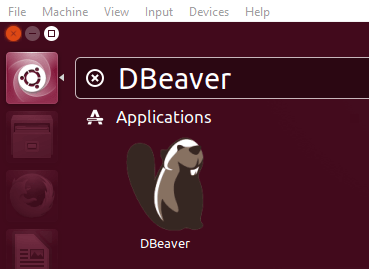
After install search for DBeaver.
enter properties in the connection manager
And connect.
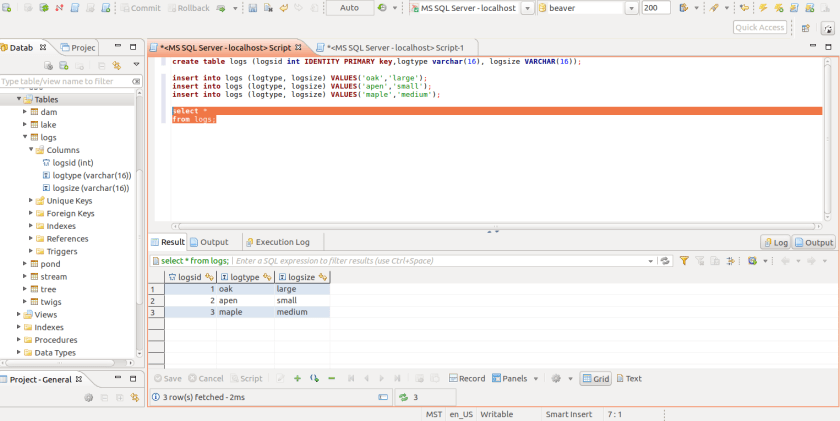
The layout and visual appeal is very good. DBeaver even has DDL and DML object scripting.

Starting with SQL Server 2017, SQL Server now runs on Linux. I installed SQL 2017 on a Ubuntu 17.04 VM. It was very easy and very fast. I would estimate the average time it takes to install SQL Server on Servers I work with is around 25 minutes. Installing SQL on Ubuntu probably took 5 minutes. I am not that familiar with Linux or Bash commands so I spent some time researching them to see what I was doing as I did the install.
Ubuntu has an “Advanced Packaging Tool (APT)” that I used to install SQL Server. The apt command is used to interact with the Advanced Packaging Tool. The first step is to import the GNU Privacy Guard (GPG) Key. This is a protection to insure that you are installing the real software from the real provider. This is telling APT not to install any packages that are not signed by the private key holder. In this case Microsoft has the private key, so APT won’t install a package that is not from Microsoft.
curl https://packages.microsoft.com/keys/microsoft.asc | sudo apt-key add -
2. Register the Microsoft SQL Server Ubuntu repository. The repository is a list of software that is compiled for the version of Linux you are using.
sudo add-apt-repository "$(curl https://packages.microsoft.com/config/ubuntu/16.04/mssql-server.list)"
one thing you will encounter is you will need to type in your password after some commands. the odd thing is it doesn’t prompt you for the PW. it just sites there and waits for you to enter it. here I wasn’t sure what was going on, so I just hit enter without the password. 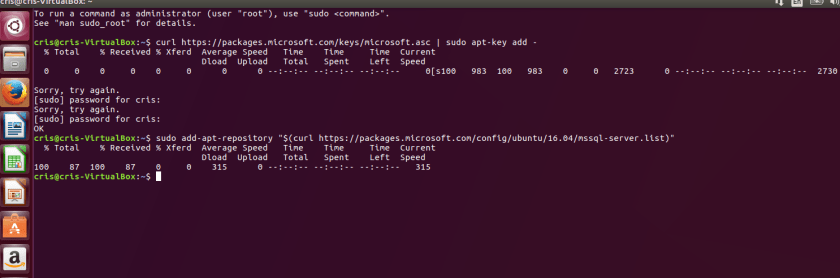
3. Now you are ready to install SQL server. This is Amazingly fast and easy. Run the following command to install SQL Server
sudo apt-get update
sudo apt-get install -y mssql-server
This will start the install.
When install is finished, install will prompt you to run setup.

4. To finish installation, run setup.
sudo /opt/mssql/bin/mssql-conf setup
Since this is a Community Technology Preview version(CTP) I don’t think it matters which one you choose. I went with 2.
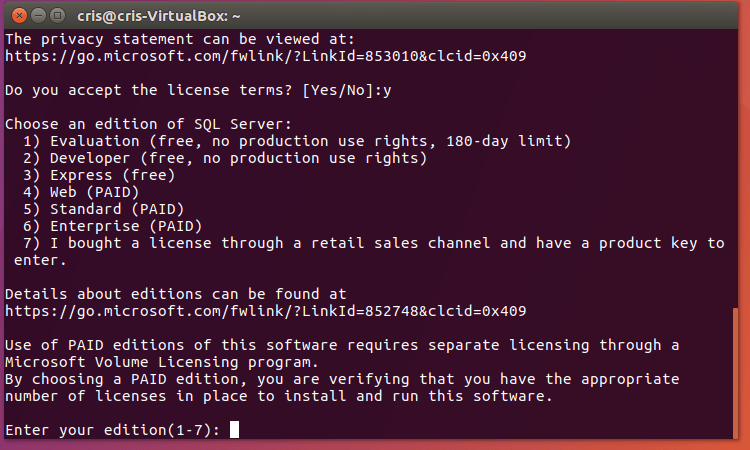
5. Follow the prompts and setup your accounts.
6. When configuration is done you can see if the SQL Service is running by:
systemctl status mssql-server
Currently SSMS is not available for Linux. Hopefully it will be in the near future. You can use SSMS on a windows client to connect to SQL Server on Linux. SQL Command is available for Linux at this time. The installation procedure is the same as installing SQL Server.
curl https://packages.microsoft.com/keys/microsoft.asc | sudo apt-key add -
2. Register the repository.
sudo add-apt-repository "$(curl https://packages.microsoft.com/config/ubuntu/16.04/prod.list)"
3. Install.
sudo apt-get update
sudo apt-get install -y mssql-tools unixodbc-dev
4. Now we can connect to SQL Server. 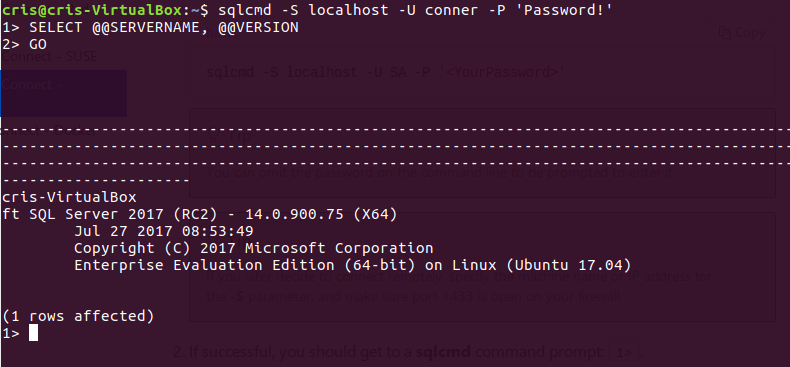
After allocating more virtual drive space in VBoxMange, the Virtual machine’s partition will need to be extended, or a new partition will need to be created to use the newly allocated space. In this blog I will use GParted to extend the primary volume and create a new partition. You can’t modify a partition that you booted from so you need to boot from another drive that has GParted on it. I will use the Ubuntu install image to boot and run Gparted.
Here is VirtualBox Manger showing that more drive space has been allocated.

* I had an issue with Gparted not seeing the new unallocated space after I allocated it in VBoxManage. I was able to fix the issue by deleting the VM snapshot I had.
Use VirtualBox manger to point the optical drive to the Ubuntu iso.

Use VirtualBox manger to make sure the boot order has the optical drive before the hard drive.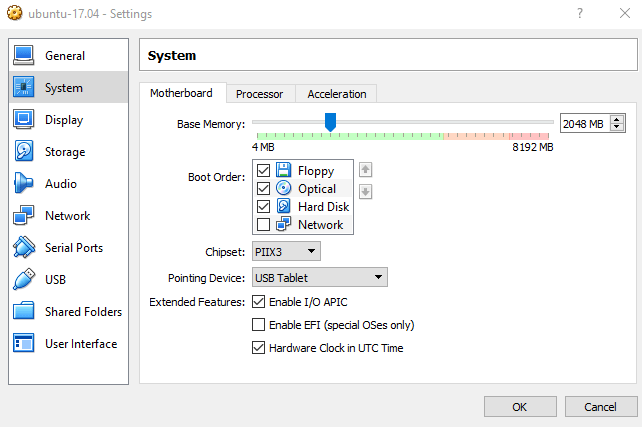
Start the virtual machine. Select “Try Ubuntu”
![2017-09-15 13_11_38-ubuntu-17.04 (Snapshot 1) [Running] - Oracle VM VirtualBox](https://crispianconner.com/wp-content/uploads/2017/09/2017-09-15-13_11_38-ubuntu-17-04-snapshot-1-running-oracle-vm-virtualbox.png?w=840)
When Ubuntu is up, search for and run GParted.
![2017-09-15 13_19_18-ubuntu-17.04 (Snapshot 1) [Running] - Oracle VM VirtualBox](https://crispianconner.com/wp-content/uploads/2017/09/2017-09-15-13_19_18-ubuntu-17-04-snapshot-1-running-oracle-vm-virtualbox.png?w=840)
The unallocated space will be visible.
![2017-09-15 14_51_20-ubuntu-17.04 [Running] - Oracle VM VirtualBox](https://crispianconner.com/wp-content/uploads/2017/09/2017-09-15-14_51_20-ubuntu-17-04-running-oracle-vm-virtualbox.png?w=840)
Click on the partition you want to extend. in this case /dev/sda. Go to partition > resize/move then move the slider to the size you would like to make the partition.
![2017-09-15 14_53_02-ubuntu-17.04 [Running] - Oracle VM VirtualBox](https://crispianconner.com/wp-content/uploads/2017/09/2017-09-15-14_53_02-ubuntu-17-04-running-oracle-vm-virtualbox.png?w=840)
Slide it over to the size you want.
![2017-09-15 14_57_25-ubuntu-17.04 [Running] - Oracle VM VirtualBox](https://crispianconner.com/wp-content/uploads/2017/09/2017-09-15-14_57_25-ubuntu-17-04-running-oracle-vm-virtualbox.png?w=840)
To make a new partition go to partition > new. Slide the size of the partition to the size you want and name the new partition.
Hit the green check to apply the changes.
![2017-09-15 15_00_55-ubuntu-17.04 [Running] - Oracle VM VirtualBox](https://crispianconner.com/wp-content/uploads/2017/09/2017-09-15-15_00_55-ubuntu-17-04-running-oracle-vm-virtualbox.png?w=840)
Exit Ubuntu, eject the virtual machines optical drive and restart normally. Check the Ubuntu Disk Manager to verify your changes.
![2017-09-15 15_05_59-ubuntu-17.04 [Running] - Oracle VM VirtualBox](https://crispianconner.com/wp-content/uploads/2017/09/2017-09-15-15_05_59-ubuntu-17-04-running-oracle-vm-virtualbox.png?w=840)
It worked!
If you need to increase the disk size on a VirtualBox vm, you will need to use VBoxManage via CMD line. Currently the GUI VBoxManager doesn’t have the functionality to increase disk. VirualBox’s documentation does make it seem like this will be added in a future release. The documentation states ” VBoxManage is the command-line interface to VirtualBox. With it, you can completely control VirtualBox from the command line of your host operating system. VBoxManage supports all the features that the graphical user interface gives you access to, but it supports a lot more than that. It exposes really all the features of the virtualization engine, even those that cannot (yet) be accessed from the GUI.” VBoxManageDoc
I needed to increase my Ubuntu VM’s disk from 10GB to around 40GB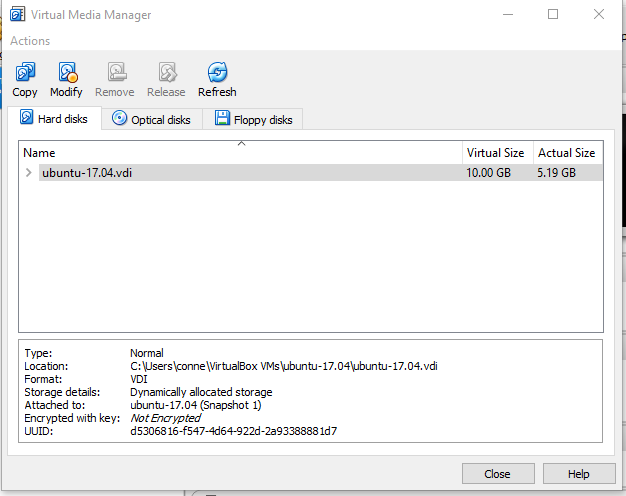
The easiest way to locate the location of your VDI is in VirtualBoxManager. Select the VM, go to settings, storage, then VDI location. Copy the location to paste into the CMD line for the next step.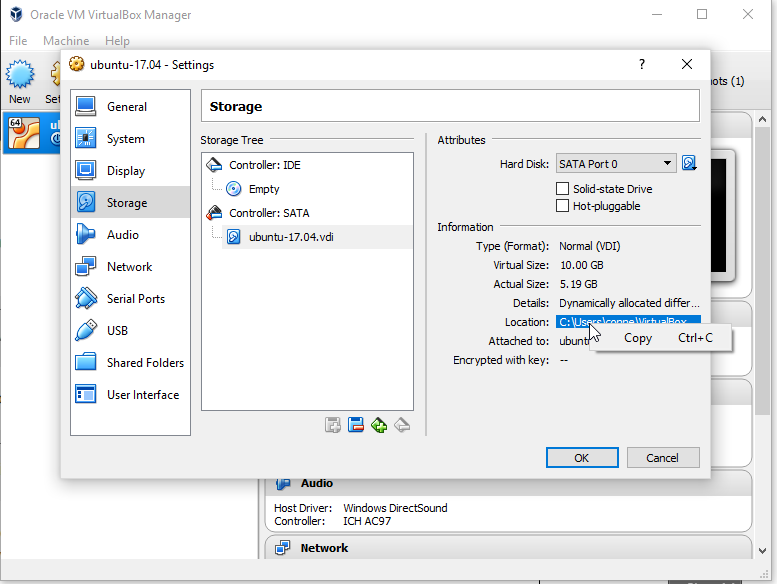
Open the CMD prompt and navigate to VBoxManage. The default location is “C:\Program Files\Oracle\VirtualBox”
Type the command below, but change the path to your VDI location and the size you want in MB.
VBoxManage modifyhd “C:\Users\conne\VirtualBox VMs\ubuntu-17.04\ubuntu-17.04.vdi” –resize 40000
VBoxManage modifyhd "C:\Users\conne\VirtualBox VMs\ubuntu-17.04\ubuntu-7.04.vdi"<span data-mce-type="bookmark" id="mce_SELREST_start" data-mce-style="overflow:hidden;line-height:0" style="overflow:hidden;line-height:0" ></span>--resize 40000

Your VDI should now be the size you specified.
Now we can check to see the new VDI size.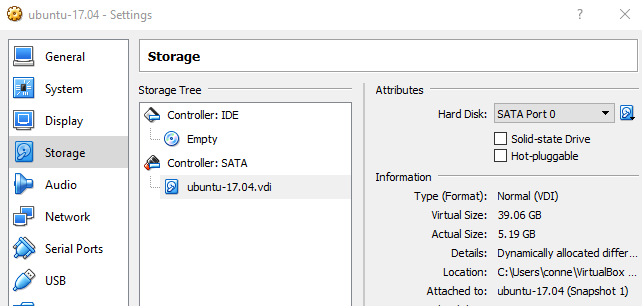
That’s it. Easy but not straightforward if you didn’t know to use VBoxManage. Hopefully Oracle will add this functionality to the GUI in a future release.
Keep in mind you will still need to extend the Ubuntu disk volume, or create a new partition to be able to use the space you just added.
There may come a time when a DBA or Server Admin may need to grant themselves system admin privileges on a SQL Server instance on which they do not have access or only have limited access to. Some examples I have faced is taking over administrative duties for a new business unit where developers built their own development instances and where Server Admins would install 3rd party application software that installs a SQL Server instance along with it. This leads to the person who did the install only making themselves sa and them using who knows what for logins and passwords. This is why DBAs should install ALL SQL instances. The DBAs should access everything through AD security groups and save ALL accounts in a password safe. The DBA security group should be added as a system admin on all SQL instances during the installation. To take this idea a step further, a Privileged Access Management System could be considered for a higher level of security, but I will leave PAM for a future blog post.
Local server administrators can gain sa access to a SQL instance by starting the instance with single user(-m), or minimal configuration(-f) startup parameters. A server admin can do this either by setting the startup parameters in SQL Server Configuration Manger or by starting the instance using Net Start with the parameters. Keep in mind that only one admin account at a time can connect when SQL is started in single user mode. Make sure you stop and disable SQL agent or it may take the only available connection. Even with the agent stopped you may still have an issue with an unknown process taking the only connection. Some things you can try to help you get the single connection are to add the Net Start and SQLCMD to run in the same line or you can disable TCP/IP since you can use can use shared memory on the server.
Stop and disable SQL Agent.

One way you can start SQL in single user mode is to set the startup parameter in SQL configuration manger. 
I think the most straightforward way is to use the cmd line. Below you can see all the commands needed to accomplish this task. Remember to start cmd prompt as administrator. Notice I used the “&” to run Net Start and sqlcmd on the same line. This is to reduce the chance something takes the only connection. After you run the line “Net Start MSSQLSERVER & sqlcmd -E”, sql cmd will display 1> when ready. Now you can add your login. I created a sql account but you could just as easily add your domain account. Type GO then hit enter to execute the batch then quit enter to exit sqlcmd. Now you can stop SQL service and start SQL service without the parameter. At this point you should be able to access the SQL Server with the login you created. 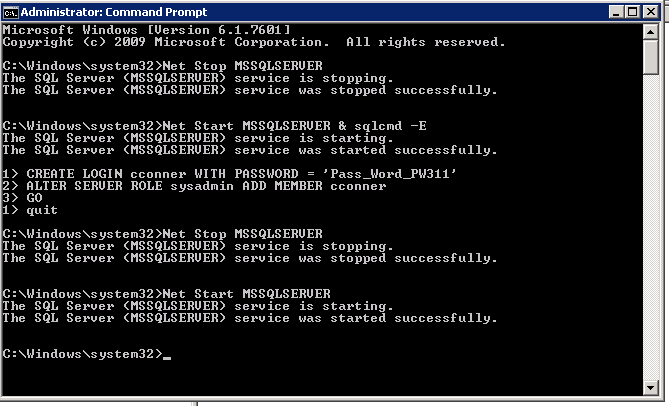
You can also accomplish the task in SSMS but don’t connect the object explorer because that counts as a connection and you can’t run a query at the same time because that would be two connections. Just hit new query, connect to instance, then add your login and make it sa.
If you are having trouble getting the error that only one administrator can connect, you can try to disable TCP\IP 
If you used SQL Server Configuration manager to start the service in single use mode, remove the parameter you added. Then start the SQL Service normally. That should be it. Now you get to look over the server and do a security audit.
